Friday, September 28, 2012

Paper Smooches Sparks - Sept 24-30 Picture Perfect Challenge

This week's Picture Perfect challenge from Paper Smooches is a kind of challenging to me. Here is the inspiration photo:


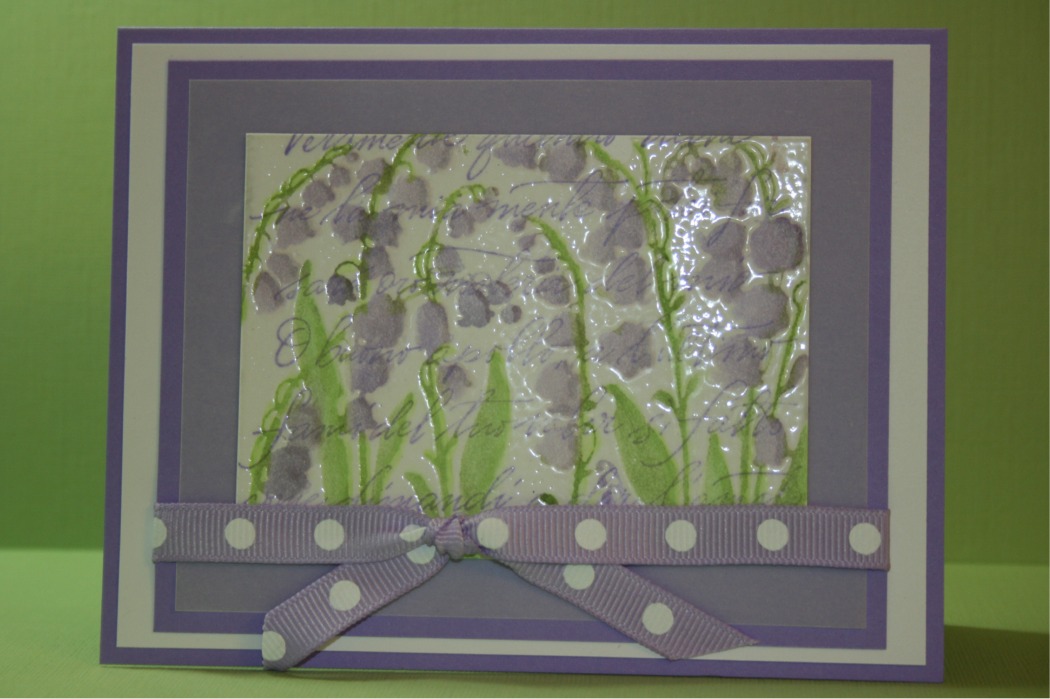
After looking at this picture for 3 days, except the colors (green, baby blue, and white) and the clock, the reflection of the mirror reminds me on the "reflection" stamping technique. So, here is the card I made:


I used the clock image from the Perpetual Bliss set and applied the "reflection" technique to make three reflections of the clocks. Then, colored the images with Distress Ink Pads and water brush pen. The "happy birthday" text is from Sentiment Sampler set. I finished the card with a die cut border at the bottom of the card and attached a border of chevron washi tape inside of the card.

Here is a closer look of the card:

Supplies:
Cardstock: PTI
Stamps: Paper Smooches (Perpetual Bliss and Sentiment Sampler sets)
Ink Pads: Distress Ink Pads, Memento
Others: water brush, border die (PTI), and washi tape (Queen & Co.)

Thank you for visiting my blog. 

Sunday, September 23, 2012

Autumn Blessings - 1 Card, 3 Challenges

I had never thought I can make one card for 3 challenges at the same time - really love these challenges. It makes me to make more cards, and the most important...it makes me to try different styles/colors of the cards. Here is the card I made:


I used Papertrey Ink's "Autumn Acorns" set to make this Autumn Blessings card. The scallop border die and stamp are from Clear and Simple Stamps' Border: Scallops. The largest acorn was stamped and colored with Copic markers. The medium acorn was stamped and applied Stickles glitter glue on the dots. Both acorns were cut out and glued with foam dots. Two little leaves hanging besides the button were also stamped and cut out. 

Here is a closer look of the card:


The 3 challenges I attend this time are:

(1) CASE Study Challenge #109 (CSC109) - here is the inspiration photo/card:

(2) The Play Date Cafe PDCC150 - here is the inspiration photo (colors: flamingo, honey, and coffee)

(3) CAS-ual Fridays, the Clean and Simple Challenge inspired by autumn (CFC71: Fall Fun)

Supplies:
Cardstock: Stampin' Up (honey & coffee), PTI (white & cream)
Stamps: PTI (Autumn Acorns set), Clear and Simple Stamps (Border: Scallops set)
Ink Pads: Stampin' Up, Memento, Distress Ink Pads
Others: scallop die, Stickles glitter glue, foam dots, Copic markers, button, jute

Thank you for visiting my blog.

Friday, September 21, 2012

Flying By to Say Hi...

Lawn Fawn's mini stamp set of "flying by" is one of my favorite sets. Even though it only has four stamps in this set, but each image can mix & match to create  different looks of the cards. Here is the Lawnscaping Challenge of Getting Texty:


Here is the card I made with the "flying by" set for the Lawnscaping Challenge #42 - Getting Texty:


I curved the text stamp to be aligned with the curved dotted stamp and make the text border with blue, orange, and green ink pads. The gap between the curved dotted lines was filled by my hand-drawn hearts with Sakura Glaze pens. Paper planes were colored by Copic markers. The blue and green planes were cut out and backed with foam dots on top of the text border. 

Since there are repetitive elements on this card - paper planes, dotted borders, and text borders, so I submit this card to the Moxie Fab World's Repetition Challenge as well. 

Here is a closer look of the card:


Supplies:
Cardstock: Stampin' Up (turquoise), PTI (white)
Stamps: Lawn Fawn (Flying By set)
Ink Pads: Memento
Others: Copic markers, Sakura Glaze pens, foam dots

Challenges:
Lawnscaping Challenge - #42 Getting Texty
Moxie Fab World - The Repetition Challenge

Thank you for visiting my blog.

Thursday, September 20, 2012

Paper Smooches Sparks Cool Shades Challenge + Moxie Fab World-The Focal Point Challenge

This week's Paper Smooches Sparks challenge is "cool shades" challenge. Here is the inspiring photo:


And here is the window card I made with these four sherbert color shades:


I used the oval die to cut out the center of card front. I stamped mountain (from "Get Outta Town" set) and fish (from "Surf and Turf" set) on the white oval cardstock, then colored with Copic markers. After that, I glue it inside the card. I cut out the stamped tree trunks and bird and attached them on the card front. Then, I stamped the text on a piece of vellum and attached it across the oval window. I shaded the borders of the card with Distress Ink pad to finish it. Since it's very obvious to tell where is the focal point of this card, so I also have this card to attend Moxie Fab World's Focal Point Challenge as well.

Here is a close look of the card:


Supplies: 
Cardstock: Tim Holtz Core'dinations Distress Colorcore Cardstock, PTI (white cardstock & vellum)
Stamps: Paper Smooches (Get Outta Town set & Surf and Turf set)
Ink Pads: Distress Ink pads
Others: Copic markers, Spellbinders oval die

Thank you for visiting my blog. 

Wednesday, September 19, 2012

Tag Cards - A Blog Named Hero Challenge #12

I believed both scrapbookers and card makers love the tags, because tags are very easy to be incorporated into the scrapbook pages and cards. Here is the challenge from A Blog Named Hero #12 - Tag! You're It!


Here is the first tag card I made for this challenge:


I used two Hero Arts background stamps to make the background - clear embossed the alphabet background and white inked the newspaper background. Attached the cut-out stamped tag upside down on top of the background. The center image of the tag was stamped and cut out, then glued on the tag. Finish it by attaching the orange ribbon on the tag.

Supplies:
Cardstock: PTI
Stamps: Hero Arts Alphabet Pattern (ST501), Hero Arts Newspaper Background (S5601), Memory Box (tag stamp), PTI (All Booked Up set)
Ink Pads: Distress Ink Pads, Momento
Others: clear embossing powder, ribbon
 
The second tag card I made has the similar layout as the first card but it's a horizontal version:


I also used two different Hero Arts background stamps to make the card background. The top one is Leaf and Floral background inked with purple ink pad. The bottom one is the Flower Dot Pattern background - white embossed the stamp, then ink with purple ink pad and spray the Perfect Pearl powder mist on top. The lavender image on the tag was colored with Copic markers. The border of the tag was decorated by purple Stickles glitter glue and a purple pearl sticker. 

Supplies: 
Cardstock: PTI
Stamps: Hero Arts Leaf and Floral Background (CG405), Hero Arts Flower Dot Pattern (CG330). Lockhart (lavender stamp), Technique Tuesday (thinking of you)
Ink Pads: Distress Ink Pads, Memento
Others: Ranger's Stickles, Copic markers, tag die (PTI), pearl sticker
  
Thank you for visiting my blog.

Monday, September 17, 2012

Moxie Fab Tuesday Trigger Challenge

This is the first time I attend Moxie Fab Tuesday Trigger Challenge. The challenge photo makes me think about a card with feminine look. I love the colors on the photo as well as the tapestry pattern under the shoes. Here is the challenge photo:


And here is the card I made for the "Envy Becomes You" challenge:


I used Distress Ink pads plus Perfect Pearls powder in the water mist bottle to make the background. Then, stamp the beautiful background stamp from Tim Holtz. The heart was hand-cut by my self and also shaded with Distress Ink pads. I made two felt blue roses with pearls in the flower centers. Stamp "i miss you" to finish this card. Thank you for visiting my blog.

Supplies:
Cardstock: PTI
Stamps: Tim Holtz (background), Technique Tuesday (i miss you)
Ink Pads: Distress Ink pads, Memento
Others: Perfect Pearl powder (Ranger), felt (PTI), rose die (MFT), pearls, corner rounder punch


Sunday, September 16, 2012

The Play Date Cafe (PDCC149) + Moxie Fab World (Asymmetry Challenge)

This is the first time I am trying to make one card for two challenges at the same time. It is fun and more challenging! The first challenge I attend is the Play Date Cafe (PDCC149) with the colors of orchid, seafoam, and tangerine. Here is the challenge photo:


And here is the card I made:


I used Papertrey Ink's "Gracious Vases" set and colored with Copic markers to make this "thank you" card. The colors matched the PDCC149 color combos. I also grouped images into one large circle and one small circle and placed them in the asymmetrical position on the card. Both circles and the positions are asymmetrical but the visual look of this card is still balanced. So, I used this card to attend Moxie Fabe World's Asymmetry Challenge as well.

Supplies: 
Cardstock: PTI
Stamps: PTI (Gracious Vases)
Ink Pads: Memento
Others: Copic markers   

Friday, September 14, 2012

Wedding Card - CASE Study Challenge #108

This is my first time to attend the CASE Study Challenge (CSC108). I love the challenge because it's based on the "study" of a card inspiration. You can have lot of rooms for your creation. Here is the inspiration card:


And here is the card I come out based on this inspiration card:


Behind the focal point of the car, I back up with a circle of vellum paper. The wedding car was colored with Copic markers and the bride & groom stamp is from Maryse Carrier (a small version of "Wedding Day #1") - it just fits in the window of the card...are they cute? I glue the headlights with gemstones stickers and also put two red hearts gemstones on top of the car.  I assembled everything on the white dry embossed harlequin background to finish the card. 

Supplies: 
Cardstock: PTI (white & vellum), Stampin' Up (red)
Stamps: PTI (Enjoy the Ride set), Maryse Carrier by Stampotique Originals (Wedding Day #1)
Others: Copic markers, gemstones, gold embossing powder, harlequin embossing folder

Thursday, September 13, 2012

Paper Smooches Sparks Challenge - Designer Drafts

Paper Smooches' "Get Outta Town" set is one of my favorite stamp sets. Why? It's because each image in this set can be the focal point of the card, but all of the images in this set can also be mixed & matched to create a fun card. Here is the Designer Draft challenge of this week:


I used the vertical layout and "Get Outta Town" set to create this card:


I cut out the hibiscus flowers to create a vertical garland for the vertical stripe. The blue and violet flowers were glued with foam dots on top of the other flowers. Flowers and palm tress were colored with Copic markers. 

Here is a close look of the card:


Tuesday, September 11, 2012

Trees Color Trends Challenge

This is another fun challenge interests me to attend. I love this color combo as well as the tree stamps. Here is the challenge:


And here is the card I made:


I used Papertrey Ink's "Falling Leaves" set to create this autumn tree card. Leaves were colored with Distress Markers. The edge of background cardstock was distressed and swiped with Distress Ink Pad (Mustard Seed). A quick & simple card.

Here is a close look of the card:

A Blog Named Hero Challenge - Who's The Boss?

Since I started my blog in August, I was excited and cannot wait to attend all kinds of fun challenges. The main purpose is not to win but just to have fun and want to see the creations from other people. I have lots of Hero Arts stamps and embossing is the basic technique for rubber stamping. Of course, I have some cards can be shared for this challenge. 

The first card I want to share is using embossing resist technique to create this lavender lily of the valley card.


Did you find out the text background stamp I used is an Hero Arts retired stamp called Italian Poetry Background. Here is the photo of this retired stamp.


After I clear embossed the Silhouette Bells image on top of the text background, I colored the flowers and leaves with Copic markers.

Supplies:
Stamps: Hero Arts Silhouette Bells (CG165), Italian Poetry Background (S1832)
Others: Copic markers, clearing embossing powder, ribbon

The second card I want to share is using layered embossing background technique to create this "Miss You" card.


This card was using watercolor paper as background. White embossed Circle Doily and Music Background stamps on the paper, then apply Distress Ink Pads and Perfect Pearls to make it shining. After the paper dry, stamp the text background on the watercolor paper. Stamp one of the Three Silhouettes stamps on the oval cut-out from Spellbinders and finish it by apply the blue pearl stickers on the hair.

Supplies:
Stamps: Hero Arts Music Background (CG222), Circle Doily (CG168), Three Silhouettes (LP195), Stampin' Up text background stamp
Ink Pads: Distress Ink Pads
Others: Perfect Pearls, white embossing powder, Spellbinders, pearl stickers

Hope you will enjoy my cards.
  

Monday, September 10, 2012

Runway Inspired Challenge - ric#19

When I saw this Runway Inspired Challenge, I know I am going to give it a try. It's because the blue and orange color combo is one of my favorite bright color combos. 


Here is the card I made inspiring by the above photo:


I used Wplus9 Design Studio's "Fish More" set to create this retirement card. The colors I used to ink the stamps, as well as the cardstock border I created are the colors showed on the menswear. This stamp set is also one of my favorite Wplus9 sets. The images are unique and all of the matching greetings are fun and cute. Here is a close look of the card.

Friday, September 7, 2012

Paper Smooches Sparks Challenge - Retro-Fab

Paper Smooches stamps are one of my favorite stamp companies. Their bold line images are very eye catchy and cute. This is the first time I try the Paper Smooches Sparks Challenge. Here is the card I made for the Retro-Fab challenge.


I used the telephone from Perpetual Bliss set as the main image,  then black embossed the image and colored with Distress Markers. "Miss You" word stamp is from Sentiment Sampler set. Love all of the words in this set. The white background was dry embossed with Spellbinders M-Bossabilities - love the hexagonal background design.

Here is the close look of the telephone.


Monday, September 3, 2012

My First Beading Experience

A few months ago, I had a chance to support a charity foundation by purchasing the handmade beading jewelry made by hearing and dumb impaired persons. They used these raised funds to support a disability orphanage in China. I bought a lot and sent them as gifts to some friends, and saved some for myself. Below are the photos of these beading jewelry I kept for myself.

These two necklaces and the cross & heart charms were made by Swarovski crystal beads and pearls. My photos did not take very well but they are really shiny in reality. Here is a close look of the beading charms.

Are they just beautifully done? I did not have the chance or had never thought I will make the beading jewelry as one of my craft hobbies. But since I saw these handmade beading jewelry, it lightened my heart and wanted to give it a try. So, I search the internet and see what options I can learn it by myself. Then, I found out the "Simply Beads Kit-of-the-Month Club" which suites my needs the best. They will mail you a kit every month and give you all of the supplies and instructions you need to make a beading jewelry set. When I received my first kit, I was kind of nervous and overwhelming on all of the supplies & instructions. But the good thing is they also have on-line video to teach you how to do it. After I watched the video, I finished my project within an hour. The good tip I learned from the video is you shall lay down all of your beads on the surface before you string them together. Below is the photo I laid down my bracelet beads pieces.

OK, here is my finished project - including a necklace, a bracelet, and a pair of earrings.

Happy Labor Day!