Thursday, March 28, 2013

Believe - Ombre Challenge in the Moxie Fab World

I made this Believe card for the ombre challenge in the Moxie Fab World. Here is the card:


I used the curve edge dies to cut two masks and applied different green colors of Distress ink pads to create the hill for the ombre effect. Then, I stamped the little house and tree on top of the hill and colored with Copic markers. Finish the card with the text greeting I love - "just believe and the impossible becomes possible".

Here is a closer look of the card:


Supplies: 
Cardstocks: PTI (cream)
Stamps: PTI (house & tree), WPlus9 Design (text greeting)
Ink Pads: Distress ink pads, Archival ink pad (black)
Others: edge die (PTI), Copic markers

Thank you for visiting my blog.


Saturday, March 16, 2013

Thank You Card

Here is the Paper Smooches Sparks for the Designer Drafts challenge:


I used the horizontal  sketch to create this thank you card:


The bottom portion of the card is made by two different polka dots washi tapes. The stamp set I used is "I Heart Art" set. The "thanks" greeting is from "Simply Said" set. Easel and watercolor palette was colored with Copic markers. The paint splashes were stamped on canvas paper and embossed with different colors of embossing powders. Here is a closer look of the splashes and love the effect:


Supplies:
Cardstocks: PTI (white), Strathmore (canvas paper)
Stamps: Paper Smooches
Ink Pads: Memento (black)
Others: Copic markers, washi tapes, Zing embossing powders, foam dots, corner rounder

Thank you for visiting my blog.
      

Monday, March 11, 2013

It's Your Lucky Day

This birthday card was made for the sketch challenge from Mama Elephant. Here is the sketch challenge picture:


And here is the card I made:


The top portion of the card was stamped with Starry Night set in light gray ink pad and the little silver embossed star is from Cosmic Stars set. The sentiment stamp is also from Starry Night set. I attached two wood veneer stars colored with Brushed Pewter Distrss Stains at the bottom right corner to balance the card.

Supplies:
Cardstocks: PTI (light gray, yellow, & orange), Stampin' Up (dark gray)
Stamps: Mama Elephant
Ink Pads: PTI (light gray), Archival Ink Pad (black), VersaMark
Others: PTI edge die, wood veneer, Brushed Pewter Distress Stain 

Thank you for visiting my blog.


Wednesday, March 6, 2013

You Make Me Smile

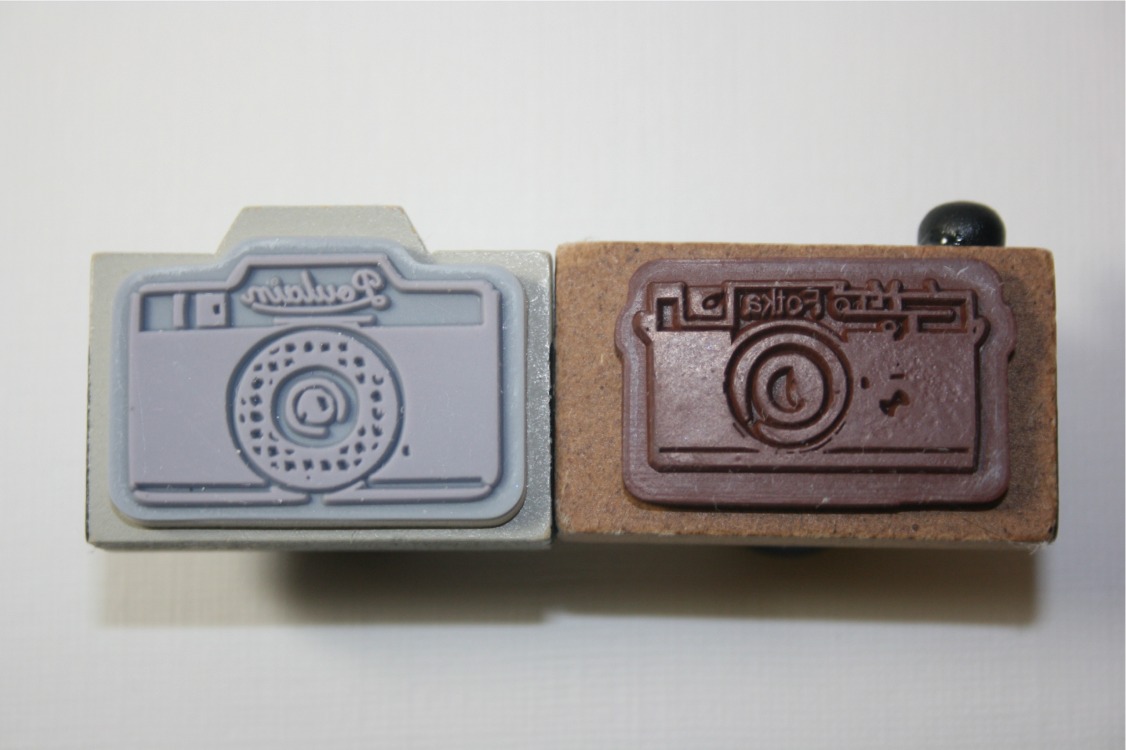
When I saw this Camera Craze Challenge on the Moxie Fab World, it remminds me of these two little cute camera stamps immediately. Here is the photo for the cute camera stamps:


Are they cute? And below is the opposite side (the rubber portion) of the stamps:


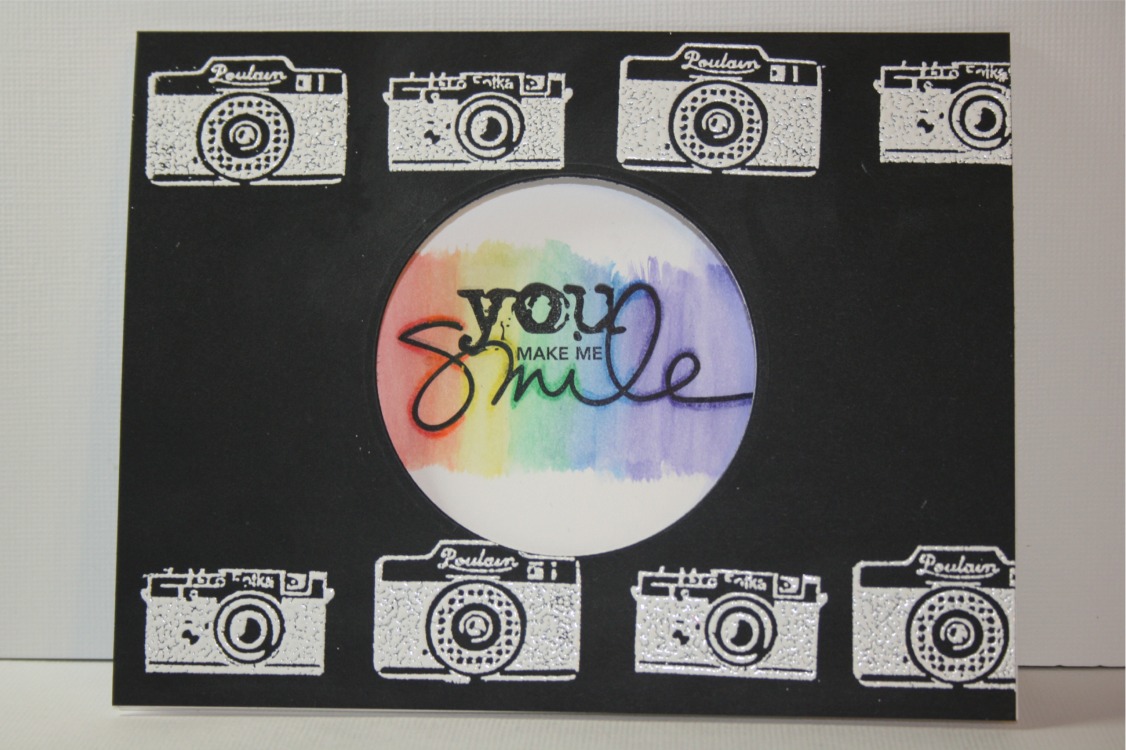
I used these two stamps to make a card with a cut-out round window on the card front. Here is the card:


The text stamp of "You make me smile" was stamped inside of the card. I used the Inktense watercolor pencils to color the words with different colors. Then, I used the water brush to brush the colored words up and down to create this rainbow effect. I learned this cool technique from Clean & Simple Card Making 2 online class. Here is the photo taken from the inside of this card:


This card is also fit into the masculine challenge from Addicted to CAS (ATCAS #7). Here is the challenge:

Supplies:
Cardstocks: PTI (white), Stampin' Up (black)
Stamps: Plaid Barn, Technique Tuesday
Ink Pads: Stampin' Up (white), Archival ink pad (black)
Dies: Spellbinders
Others: Inktense watercolor pencils, water brush, white embossing powder

Thank you for visiting my blog.
      

Monday, February 25, 2013

Two Hearts One Love - ric#30

Runway Inspired Challenge is one of my favorite challenges - because the inspiration is from fashion. Here is the challenge from Erdem:


And below is the card I made for this ric#30 challenge:


It's easy to tell the stripe in the middle of the card is inspired by the dress on the right, and the bottom pink and blue posies are inspired by the dress on the left. The stripe was stamped with JudiKins' stamp three times with black ink to form the stripe. Then, colored with yellow, blue, and pink Inktense watercolor pencils. The bottom posies were stamped with white pigment ink, then colored with blue and pink colored pencils on top of the white ink. Finish the card with "two hearts one love" stamp from Technique Tuesday and edge border die from Papertrey Ink. Attached three pink pearl stickers for the final decoration.

Supplies:
Cardstocks: PTI (white), Stampin' Up (black)
Stamps: JudiKins, Papertrey Ink, Technique Tuesday
Ink Pads: Archival ink pad (black), Stampin' Up (white)
Dies: Papertrey Ink
Others: Inktense watercolor pencils, Prismacolor pencils, pearl stickers

Thank you for visiting my blog.


Saturday, February 9, 2013

One Layer Card

I had so much fun attending the Clean & Simple Card Making 2 on-line class for the past two weeks. I enjoyed all of the techniques learned in the class. One of the card techniques I want to try the most is the one layer card. Here is the one layer card I made:


I combined several techniques on this one layer card - masking, embossing folders with embossing diffuser, and glittering. The popped polka dots were stamped with Memento ink pads with different colors. The "love" die is from Paper Smooches' new die. The pink glitters were sprinkled on the 1/8" score tape to make a border. Finish this card by the corner rounders and two heart crystal stickers. Here is a closer look on the masking "love" die:


Paper Smooches also has a trend watch challenge this week with polka dots as focus. I also have this card to join this challenge. Here is the challenge photos:

Supplies:
Cardstocks: PTI (white)
Stamps: Paper Smooches (Little Needle Love)
Ink Pads: Memento, Distress Ink Pads
Dies: Paper Smooches (Love), Spellbinders (round die)
Others: embossing folder (Cuttlebug), embossing diffuser (Sizzix), score tape, masking sheet (Judikins Eclipse), glitters (Glitter Ritz Microfine), corner rounder, heart crystal stickers

Thank you for visiting my blog and Happy Chinese New Year!
        

Wednesday, February 6, 2013

Love Letters

Lavender is my favorite color and it means romantic to me. When I see the "Love Letters" challenge (CFC88) from CAS-ual Fridays this week, I just want to make a lavender love card. Here is the challenge:


And this is the card I made:


This card may not look like clean, but it is simple for me (LOL). I just applied three different colors of Distress Ink Pads and spritz with Perfect Pearl water to make the background. Then, I stamped the lavenders on the background with light green ink pad. I used Inktense watercolor pencils to draw the lavenders with purple on flowers and green on stems. I brushed the water brush on the flowers and stems to make a watercolor effect. I also cut out two lavenders with die cuts and attach on the background to make a dimensional effect. The "LOVE" letters were die cut letters from Memory Box. After I die cut the letters with white cardstocks, I applied the white enamel accents from Ranger on the letters. After the letters are dry, I glued them on the top right corner to finish the card. Here is a closer look of the letters (love it!):


Supplies:
Cardstocks: PTI (white)
Stamps: Papertrey Ink.
Ink Pads: Distress Ink Pads
Dies: Papertrey Ink. (lavenders), Memory Box (letter dies)
Others: Perfect Pearls, Inktense watercolor pencils, water brush, white enamel accents

Thank you for visiting my blog. 

Saturday, February 2, 2013

Sending Love

I joined the Clean & Simple Card Making 2 lesson starting from January 28 this week. Just finish the first week lesson and cannot wait for the next week. This class is really amazing and inspiring me so much. The class even assigned a homework everyday - let me feel I am really a student in class. Here I made a card based on the Day 1 homework assignment using one of the sketches. The content of the card was also inspired by Paper Smooches' Picture Perfect challenge of this week. Here is the challenge photo:


This is the card I made for the homework and challenge:


The background stencil template is from Plaid. I applied the orange Distress Ink to create the background. Focal point is the sewing machine from the "Needle Little Love" set and colored with Copic markers. I also stamped the stitched heart from this set on the background circle and highlighted with stardust gelly roll pen. Finish this card by the "sending love" text from Simon Says Stamp's "Handwritten Sentiments" set. The little "X" stitches are also from "Needle Little Love" set. Here is a closer look of the card:


Notice that I spray the Shimmer Spritz onto the sewing machine and make a little bit sparkles? I also attached the white pearl stickers colored with matching colors of Copic markers.

I just realized this card can also attend this week's challenge of Addicted to CAS #5 - Heart. Here is the challenge photo:

Supplies:
Cardstocks: PTI (white), Stampin' Up (gray)
Stamps: Paper Smooches (Needle Little Love), Simon Says Stamps (Handwritten Sentiments)
Ink Pads: Distress Ink Pad (orange), Memento (black), Stampin' Up (gray)
Others: Plaid stencil template, circle die, Copic markers, foam dots, pearl stickers, Shimmer Spritz, Sakura Gelly Roll Stardust Clear pen
    
Thank you for visiting my blog.